Ready to level up your waffle game? With a mini waffle maker recipe, you can whip up epic waffle creations in no time, perfect for any morning, brunch, or snack break! Whether you’re craving something sweet or savory, this easy recipe will show you how to make delicious, crispy waffles with just a few simple ingredients. The best part? Top them however you like—each batch can reflect your personal taste. Plus, it’s a family-friendly recipe that’s quick enough for busy mornings and fun enough to get the kids involved. So, grab your mini waffle maker and let’s get started on creating waffles that are as tasty as they are easy!
Table of Contents
Table of Contents
Key Benefits of Using a Mini Waffle Maker
Mini waffle makers aren’t just a fun kitchen gadget—they’re a game-changer when it comes to making quick, delicious meals! Here’s why they should be your new best friend in the kitchen:
- Speed and Convenience: Mini waffle makers cook waffles in just a few minutes, making them perfect for busy mornings when you need a quick breakfast or snack. No more waiting around for large waffle irons to heat up or taking time away from your day!
- Perfect for Small Batches: Whether you’re cooking for yourself, a partner, or your little ones, a mini waffle maker allows you to make just the right amount of waffles without any leftovers. It’s ideal for anyone who wants a single serving or to mix up flavors for different tastes.
- Fun and Customizable: This isn’t just about waffles; it’s about making breakfast your own! With a mini waffle maker, you can easily experiment with different flavors, toppings, and even make savory options. From classic buttermilk waffles to chocolate-chip variations, the possibilities are endless.
- Space-Saving and Easy to Store: Unlike larger kitchen appliances, mini waffle makers are compact and easy to store, making them perfect for even the tiniest of kitchens. No heavy gear required—save your counter space for what matters
- Family-Friendly Fun: Making waffles with a mini waffle maker is a great activity to involve the whole family. Kids love watching the waffles cook, and they’ll enjoy adding their own toppings, turning the process into a fun and interactive experience.
- Versatility: Not just for breakfast! These mini waffle makers can also be used to create quick snacks, like waffle sandwiches or even dessert waffles. Imagine waffles with a scoop of ice cream—how amazing does that sound?
By using a mini waffle maker, you’re unlocking a world of waffle-making possibilities that are not only easy and quick but also adaptable to any occasion. So why wait? Start making your own epic waffle creations today!
Ingredients: What You’ll Need for Perfect Waffles
Before you start cooking up a storm with your mini waffle maker, let’s gather everything you’ll need for these epic waffles. The beauty of this recipe lies in its simplicity—just a few basic ingredients to get you on your way to waffle perfection.

The Essentials:
- 1 cup all-purpose flour: This is the base of your waffle batter. That’s what creates the signature light and fluffy texture in the waffles.
- 1 tablespoon sugar: Adds a touch of sweetness that balances the other ingredients.
- 1 teaspoon baking powder: Helps the waffles rise and become nice and fluffy.
- ¼ teaspoon salt – Brings out the flavors and balances the batter.
- 1/2 cup milk: You can use whole milk, almond milk, or any other milk of your choice. This adds moisture to your batter.
- 1 large egg: Provides structure to your waffles and helps bind everything together.
- 2 tablespoons melted butter: This adds richness and helps the waffles crisp up on the outside while staying soft on the inside.
- 1 teaspoon vanilla extract: For that extra layer of flavor that makes the waffles irresistibly delicious!
Optional Toppings and Add-ins:
- Chocolate chips: Want to make things extra indulgent? Stir in a handful of chocolate chips for gooey, melty bites in every waffle.
- Berries: Fresh blueberries, strawberries, or raspberries are perfect for topping your waffles, adding a burst of freshness and color.
- Whipped cream or syrup: Classic toppings that never go out of style—whipped cream adds a light and fluffy texture, while syrup offers that sweet, sticky goodness.
- Nuts: Chopped pecans or walnuts add a crunchy texture that contrasts beautifully with the soft waffles.
These ingredients are a great foundation, but feel free to customize your waffles to your taste! If you’re in the mood for a savory option, you can swap some of the sugar for herbs or cheese to make cheesy waffles. Whatever you choose, your mini waffle maker is ready to help you create a delicious meal in no time!
Instructions: Your Appliance’s Big Moment Mastering Perfect Waffles at Home.
Now that you’ve got your ingredients prepped, it’s time to turn them into something delicious! Don’t worry—making waffles in your mini waffle maker is incredibly easy. Follow these simple steps, and you’ll be enjoying a batch of golden, crispy waffles in no time.
Step 1: Preheat the Mini Waffle Maker
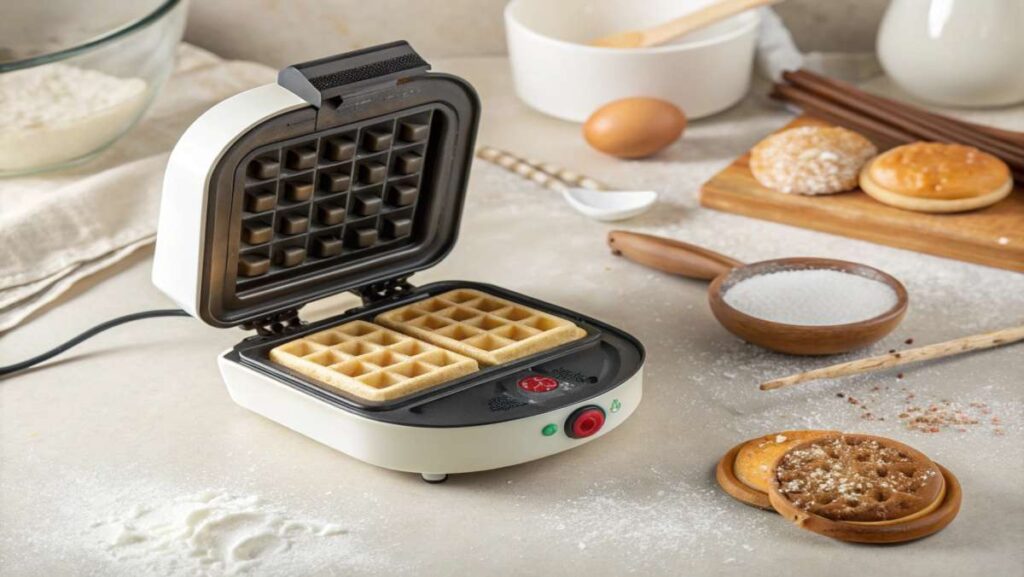
Plug in your mini waffle maker and let it heat up for 3-5 minutes. Most mini waffle makers have a light that will turn on or change color when it’s ready. Getting the waffle iron nice and hot is key to achieving that perfect crisp texture.
Step 2: Whisk the Dry Ingredients
In a medium bowl, combine the flour, sugar, baking powder, and salt with a whisk.
These ingredients will form the base of your waffle batter and should be well-mixed to ensure even texture.
Step 3: Whisk the Wet Ingredients
In another bowl, whisk together the milk, egg, melted butter, and vanilla. Make sure the butter isn’t too hot when you add it, as it could cook the egg. A brief stir creates a smooth, creamy batter base.
Step 4: Combine Wet and Dry Ingredients
Gradually pour the wet mixture into the dry ingredients, stirring gently with a spoon or spatula. Stir just until the batter comes together. Be careful not to overmix—lumps are okay! Overmixing can lead to dense waffles, and we want them light and fluffy.
Step 5: Cook the Waffles
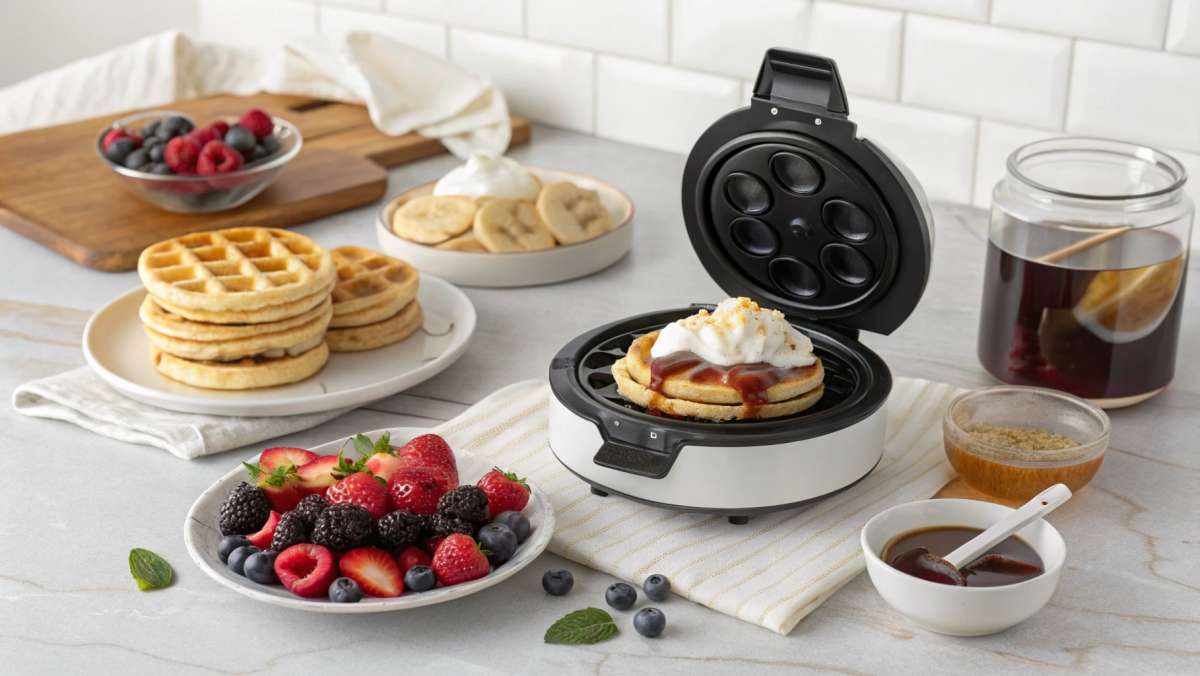
Lightly grease the mini waffle maker with a little cooking spray or melted butter. Spoon approximately ¼ cup of batter into the center of the hot waffle maker. You can adjust the amount based on the size of your mini waffle maker. Shut the lid and let it cook for 3–4 minutes until golden. When ready, the waffles will be golden and crispy. You’ll know it’s ready when the steam begins to slow down, signaling that the waffles have fully cooked.
Step 6: Remove and Serve
Carefully open the waffle maker and remove the waffles using a fork or tongs. Serve immediately while they’re hot and crispy! Stack them up on a plate and top them with whatever your heart desires—fresh fruit, maple syrup, whipped cream, or a sprinkle of powdered sugar.
Pro Tip: If you’re making multiple batches, keep your waffles warm by placing them on a baking sheet in a low oven (around 200°F or 93°C) while you cook the rest. This helps them stay crisp and makes serving a breeze.
Time to dig into your crispy, golden waffle triumph! Whether it’s a special treat or a quick breakfast, these mini waffle maker waffles are sure to be a hit.
Freshly made mini waffles with a variety of toppings, fruits, and batters—perfect for creative breakfast ideas.
Pro Tips and Variations: How to Make Your Waffles Even Better
Now that you’ve mastered the basics of waffle making, let’s take things up a notch! Check out these expert tips and creative twists to take your waffles to the next level.
Pro Tips for Perfect Waffles Every Time
Don’t Overmix the Batter: It’s tempting to stir the batter until it’s completely smooth, but a few lumps are totally fine. Overmixing can cause the waffles to become dense and tough. A few gentle stirs are all you need for fluffy waffles.
Preheat Your Waffle Maker: This might sound obvious, but it’s important to let your mini waffle maker preheat fully. If it’s not hot enough when you add the batter, your waffles won’t get that golden, crispy texture we all love.
Grease the Waffle Maker: Even if your waffle maker has a non-stick surface, a quick spritz of cooking spray or a dab of butter can help your waffles cook evenly and make cleanup easier.
Avoid Overfilling the Waffle Maker: Add just enough batter to cover the center of the waffle maker—about 1/4 cup per waffle. Too much batter can overflow and cause a mess. If you’re not sure, start small and add a little more next time.
Fun Variations to Try
Chocolate Chip Waffles: Add a handful of chocolate chips to your batter for a sweet, gooey surprise inside each waffle. The heat from the waffle maker will melt the chips, creating pockets of chocolatey goodness.
Banana Nut Waffles: For a heartier option, stir in some mashed bananas and chopped walnuts into the batter. This gives your waffles a deliciously nutty flavor and a boost of nutrition.
Cinnamon Swirl Waffles: Mix a teaspoon of cinnamon into your batter, and then drizzle a little cinnamon sugar over the top before cooking. This creates a delightful swirl and a sweet, spiced flavor in every bite.
Savory Waffles: Want to switch things up? Try making savory waffles by swapping the sugar for cheese and herbs. Cheddar, parmesan, or even crumbled bacon can add a savory twist that pairs perfectly with eggs and avocado.
Vegan or Dairy-Free Waffles: You can easily make these waffles vegan by substituting the milk with almond milk or oat milk, and using a flax egg (1 tablespoon flaxseed meal + 3 tablespoons water). Use plant-based butter instead, and you’re all set!
Gluten-Free Waffles: If you’re gluten-sensitive, try swapping the all-purpose flour for a gluten-free flour blend. Make sure it’s one that includes xanthan gum to help the waffles hold together.
Mix and Match Your Toppings
The best part about waffles is the endless topping possibilities. Need inspiration? Try one of these ideas to begin.
Fresh Fruits: Try topping your waffles with fresh berries, sliced bananas, or kiwi for a burst of flavor.
Syrup and Honey: Go classic with maple syrup or drizzle honey for a natural sweetness.
Whipped Cream – Top with a generous spoonful for a rich, creamy finish.
Ice Cream – Add a scoop of vanilla or chocolate to transform your waffles into a decadent dessert. A perfect treat for any occasion!Tiny
Serving Suggestions: How to Make Your Waffles Shine
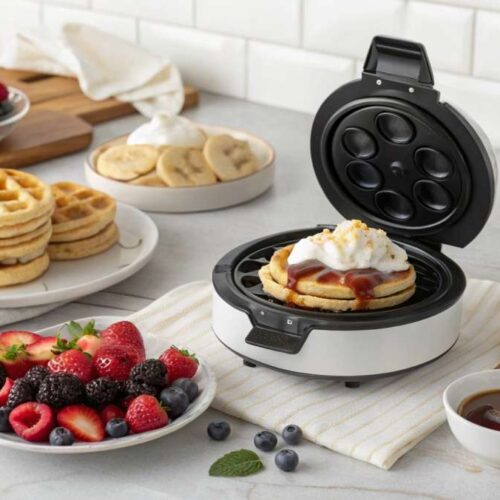
Once your waffles are golden brown and perfectly crispy, it’s time to serve them up! The best part about waffles is how versatile they are—whether you prefer sweet, savory, or something in between, there’s a topping or side that’s perfect for every mood. Level up your waffle game with these crave-worthy twists!
Sweet Serving Suggestions
- Classic Maple Syrup: You can’t go wrong with the traditional pairing of warm maple syrup. Pour it over your waffles, let it soak in, and enjoy every sweet, sticky bite. For extra indulgence, heat the syrup with a cinnamon stick or a splash of vanilla extract to enhance the flavor.
- Fresh Fruits: Fresh berries like blueberries, strawberries, or raspberries add a burst of sweetness and a pop of color. Or try sliced bananas for a creamy, tropical twist. Pair with a dollop of whipped cream for a truly decadent touch!
- Yogurt and Granola: If you’re looking for a lighter yet delicious topping, try adding a spoonful of Greek yogurt and a sprinkle of crunchy granola on top. This adds creaminess and texture, making for a balanced treat.
- Chocolate Drizzle: For chocolate lovers, drizzle some melted chocolate or Nutella over your waffles. You can even sprinkle on a few chocolate chips or mini marshmallows for an extra sweet treat.
- Ice Cream: Turn your waffles into an unforgettable dessert by adding a scoop of your favorite ice cream. Vanilla, chocolate, or even a scoop of caramel ice cream will melt perfectly over the warm waffles.
Savory Serving Suggestions
- Savory Breakfast Twist: Layer golden waffles with crispy bacon and fluffy scrambled eggs—or go sunny-side-up for a runny yolk finish!. This makes for a filling meal that’s both sweet and savory—perfect for a hearty brunch.
- Avocado and Poached Eggs: If you’re craving something lighter but still savory, try topping your waffles with avocado slices and a poached egg. The creamy avocado paired with the runny yolk makes for a delightful contrast to the crisp waffles.
- Gravy: For a true comfort food experience, drizzle some homemade sausage gravy over your waffles. It’s a Southern-inspired classic that’s rich, creamy, and absolutely delicious.
- Cheese and Herbs: If you’re in the mood for something a little different, top your waffles with a sprinkle of shredded cheese and fresh herbs like chives or parsley. It’s simple yet flavorful and makes for an excellent savory snack.
Fun Pairings
- Coffee or Tea: Waffles go wonderfully with a hot cup of coffee or tea. A fresh latte or a strong black coffee pairs especially well with sweet waffles, while a soothing herbal tea can complement savory waffles beautifully.
- Fresh Juice: For a light, refreshing touch, serve your waffles with a glass of freshly squeezed orange juice or a fruit juice blend. It’s a great way to balance the richness of the waffles with a burst of citrusy freshness.
Mix and Match
Go wild! Mix, match, and reinvent your waffles with bold toppings. The great thing about waffles is that they’re like a blank canvas—ready to be adorned with whatever you’re craving. Mix and match sweet and savory toppings for an unforgettable waffle feast that’s as customizable as you are!
With these serving suggestions, you can turn a simple batch of waffles into a show-stopping breakfast, brunch, or dessert. Whether you’re hosting friends or enjoying a quiet morning alone, these waffles will always impress. Enjoy!
Turn breakfast into a fun DIY waffle bar with this mini waffle maker and a spread of sweet and savory toppings.
mini waffle maker recipes
Ingredients
The Essentials:
- 1 cup all-purpose flour: This is the base of your waffle batter. It gives the waffles their classic light and fluffy texture.
- 1 tablespoon sugar: Adds a touch of sweetness that balances the other ingredients.
- 1 teaspoon baking powder: Helps the waffles rise and become nice and fluffy.
- 1/4 teaspoon salt: Enhances the flavors and helps the batter come together.
- 1/2 cup milk: You can use whole milk almond milk, or any other milk of your choice. This adds moisture to your batter.
- 1 large egg: Provides structure to your waffles and helps bind everything together.
- 2 tablespoons melted butter: This adds richness and helps the waffles crisp up on the outside while staying soft on the inside.
- 1 teaspoon vanilla extract: For that extra layer of flavor that makes the waffles irresistibly delicious!
Optional Toppings and Add-ins:
- Chocolate chips: Want to make things extra indulgent? Stir in a handful of chocolate chips for gooey melty bites in every waffle.
- Berries: Fresh blueberries strawberries, or raspberries are perfect for topping your waffles, adding a burst of freshness and color.
- Whipped cream or syrup: Classic toppings that never go out of style—whipped cream adds a light and fluffy texture while syrup offers that sweet, sticky goodness.
- Nuts: Chopped pecans or walnuts add a crunchy texture that contrasts beautifully with the soft waffles.
Instructions
Step 1: Preheat the Mini Waffle Maker
- Plug in your mini waffle maker and let it heat up for 3-5 minutes. Most mini waffle makers have a light that will turn on or change color when it’s ready. Getting the waffle iron nice and hot is key to achieving that perfect crisp texture.
Step 2: Whisk the Dry Ingredients
- In a medium mixing bowl, whisk together the flour, sugar, baking powder, and salt. These ingredients will form the base of your waffle batter and should be well-mixed to ensure even texture.
Step 3: Whisk the Wet Ingredients
- In a separate bowl, whisk the milk, egg, melted butter, and vanilla extract. Make sure the butter isn’t too hot when you add it, as it could cook the egg. A quick mix will make a smooth, creamy base for your batter.
Step 4: Combine Wet and Dry Ingredients
- Gradually pour the wet mixture into the dry ingredients, stirring gently with a spoon or spatula. Stir just until the batter comes together. Be careful not to overmix—lumps are okay! Overmixing can lead to dense waffles, and we want them light and fluffy.
Step 5: Cook the Waffles
- Lightly grease the mini waffle maker with a little cooking spray or melted butter. Pour about 1/4 cup of batter into the center of the preheated waffle maker. You can adjust the amount based on the size of your mini waffle maker. Shut the lid and let it cook for 3–4 minutes until golden. The waffles should be golden brown and crisp when done. You’ll know it’s ready when the steam begins to slow down, signaling that the waffles have fully cooked.
Step 6: Remove and Serve
- Carefully open the waffle maker and remove the waffles using a fork or tongs. Serve immediately while they’re hot and crispy! Stack them up on a plate and top them with whatever your heart desires—fresh fruit, maple syrup, whipped cream, or a sprinkle of powdered sugar.
Notes
Conclusion: Why You’ll Love These Mini Waffle Maker Recipes
If you’re looking for a quick, delicious, and versatile way to enjoy waffles, then this mini waffle maker recipe is for you! Whether you’re making waffles for breakfast, brunch, or even dessert, this recipe delivers crispy, golden perfection every time. It’s simple, customizable, and the perfect excuse to indulge in a little treat whenever the mood strikes.
These mini waffles are incredibly easy to prepare, and the best part is that you can get creative with toppings, flavors, and ingredients. Whether you’re adding fresh berries, a drizzle of syrup, or even making savory waffles with bacon and eggs, the possibilities are endless! Plus, the mini waffle maker recipe makes them quick and hassle-free, perfect for busy mornings or weekend get-togethers.
Why This Recipe Is a Winner:
- Quick & Easy: Get perfect waffles in under 10 minutes—perfect for busy mornings or when you want a quick snack.
- Customizable: From sweet to savory, you can make these waffles exactly the way you like them, with endless topping and flavor variations.
- Fun for All Ages: Mini waffles are a hit with kids and adults alike. It’s a fun, interactive meal that can be personalized for everyone at the table.
- Perfect for Any Occasion: Whether it’s a lazy weekend breakfast, a festive brunch, or a late-night treat, these waffles are the perfect solution.
With these mini waffle maker recipes in your back pocket, you’ll never have to settle for boring breakfasts again. They’re the perfect way to start your day with a smile—or end it on a sweet note!
Enjoy your waffle-making adventure, and don’t forget to experiment with new flavors and toppings. The fun is in the creativity! Happy cooking!
FAQs: Everything You Need to Know About Mini Waffle Makers
Have questions about using your mini waffle maker? Don’t worry—we’ve got you covered! Here are some common questions about the recipe and the mini waffle maker, along with helpful tips to ensure your waffle-making experience is a success.
1. Can I use any batter in my mini waffle maker?
Yes, you can use a variety of batters in your mini waffle maker! The key is to ensure that the batter is thick enough to hold its shape when cooked. For thinner batters, like pancake batter, your waffles may come out a little more delicate. You can also experiment with gluten-free, dairy-free, or vegan batters—just be sure to adjust the ingredients accordingly.
2. How do I prevent my waffles from sticking to the waffle maker?
To prevent sticking, lightly grease your waffle maker before adding the batter. You can use cooking spray, a small amount of melted butter, or a little bit of oil. This ensures your waffles cook evenly and makes cleaning up much easier. Just be careful not to use too much, as excess grease can create a mess.
3. How long do I cook waffles in a mini waffle maker?
Mini waffle makers typically take 3-4 minutes to cook waffles. However, the exact time can vary depending on your specific waffle maker model. The waffles are done when they’re golden brown and crispy. Keep an eye on them, and you’ll be able to gauge the perfect cooking time after a few tries!
4. Can I make multiple batches of waffles at once?
If you’re making waffles for a crowd, you can definitely make multiple batches! Just be sure to keep the cooked waffles warm while you finish the rest. Place the waffles on a baking sheet in a low oven (around 200°F or 93°C) to keep them warm without making them soggy. This will ensure everyone gets to enjoy fresh, crispy waffles at the same time.
5. Can I freeze leftover waffles?
Yes! These waffles freeze beautifully. After they cool down, place them in an airtight container or a zip-top bag and store them in the freezer. When you’re ready to eat, simply toast them in a toaster or reheat them in the oven for a quick and easy breakfast.
6. How can I make my waffles extra crispy?
If you love crispy waffles, here’s a trick: Once you’ve cooked the waffles, place them on a cooling rack instead of stacking them on a plate. This allows air to circulate and helps keep them crispy. You can also cook them a little longer in your mini waffle maker, but keep an eye on them to prevent burning.
7. Can I make savory waffles in my mini waffle maker?
Absolutely! Savory waffles are a delicious option for brunch or even dinner. Try adding cheese, herbs, or bacon to the batter for a savory twist. You can also top your waffles with avocado, fried eggs, or even gravy for a hearty meal. The mini waffle maker is versatile enough to handle both sweet and savory creations!
8. What’s the best way to clean my mini waffle maker?
Cleaning your mini waffle maker is simple! After it cools down, wipe it down with a soft cloth or paper towel to remove any crumbs or batter residue. If needed, use a gentle dish soap and warm water to clean the plates, but avoid submerging the waffle maker in water. Most mini waffle makers also have non-stick plates, making cleanup even easier!
9. Can I double or halve the recipe?
Yes, you can easily adjust the recipe to make more or fewer waffles. Just be sure to maintain the same ingredient ratios for the best results. If you’re making a larger batch, it might take a little extra time, but the process remains the same.