What if I told you the most raved-about dessert at your next gathering could be made with just five minutes of hands-on time? This isn’t magic—it’s the irresistible charm of a perfectly crafted cheesecake ball recipe, and today I’m sharing the recipe that’s earned me more recipe requests than anything else in my repertoire.
Imagine: silky-smooth cheesecake ball recipe transformed into a shareable centerpiece, its exterior rolled in crunchy graham cracker crumbs that give way to a cloud-like interior. The genius? It requires no baking, adapts to any flavor whim (from chocolate chip to strawberry swirl), and always disappears before anything else on the dessert table.
I first created this for a last-minute girls’ night when time wasn’t on my side. The result? Every guest left with the recipe in their phones. Now it’s your secret weapon for effortless entertaining.
The best part? You’re just one bowl and a quick chill away from dessert perfection. Ready to make the treat that will have everyone asking, “How is something this good so simple?
Table of Contents
Table of Contents
Key Benefits: Why This Cheesecake Ball recipe Will Become Your Signature Dessert
This isn’t just another dessert—it’s your new secret weapon for stress-free entertaining. Here’s why this cheesecake ball stands out:
Effortless Elegance
No baking required—just mix, chill, and roll! Perfect for when oven space is scarce (looking at you, holiday cooks).
5 simple ingredients you likely have on hand: cream cheese, butter, powdered sugar, vanilla, and graham crackers.
Customizable Crowd-Pleaser
Swap graham crackers for:
• Crushed Oreos (for a cookies-and-cream twist)
• Toasted coconut (tropical vibes)
• Chopped pecans (for a praline-inspired crunch)
Add mix-ins like lemon zest, mini chocolate chips, or a swirl of caramel.
Make-Ahead Magic
Prep it up to 3 days ahead—flavors deepen as it chills!
Travels like a dream (no spills!) for potlucks or picnics.
Pro Insight: For the creamiest texture, use room-temperature cream cheese—it blends seamlessly without lumps.
Ingredients: The Simple Staples Behind Magic
Gather these pantry heroes to create your cheesecake ball recipe masterpiece—each plays a special role in achieving that perfect balance of velvety richness and satisfying crunch:
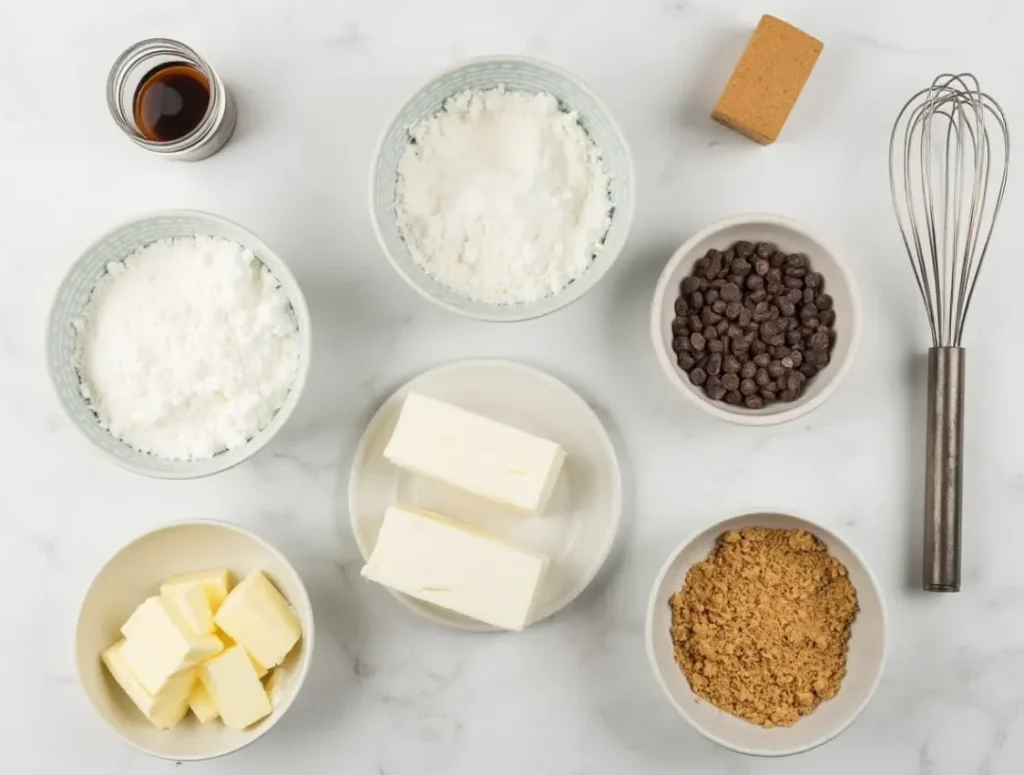
The Dream Team:
- 16 oz full-fat cream cheese, softened (the star that creates that lush, creamy base)
- 1/2 cup unsalted butter, softened (adds luxurious silkiness)
- 1 1/4 cups powdered sugar (dissolves perfectly for a smooth texture)
- 2 tsp pure vanilla extract (for that warm, bakery-style flavor)
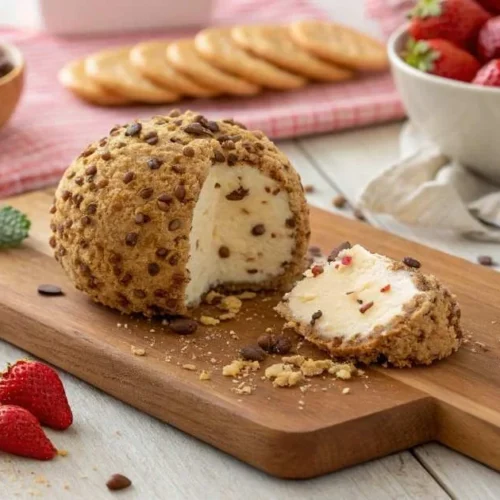
- 1 1/2 cups graham cracker crumbs (for the iconic sweet-crisp coating)
Easy Swaps for Dietary Needs:
- Gluten-free? Use gluten-free graham crackers or almond flour.
- Lower sugar? Reduce powdered sugar to 3/4 cup—it’ll still hold shape!
- Dairy-free? Substitute with vegan cream cheese and plant-based butter.
Pro Tips for Success:
Taste as you go: Love tang? Add a splash of lemon juice to brighten the flavors.
Room temp matters! Cold cream cheese = lumpy texture. Allow the ingredients to sit at room temperature for 30 minutes.
Crush smarter: Pulse graham crackers in a baggie (less mess!) or buy pre-crushed.
Instructions: Crafting Your Perfect Cheesecake Ball recipe Step-by-Step
Let’s transform those simple ingredients into a showstopping dessert! Follow these foolproof steps for cheesecake ball success:
Step 1: The Creamy Base
- In a large mixing bowl, beat the softened cream cheese and butter together with an electric mixer on medium speed until perfectly smooth (about 2 minutes).
- Pro Tip: Scrape down the sides of the bowl halfway through to ensure no lumps remain.
- Gradually add the powdered sugar and vanilla extract, mixing on low speed until fully incorporated.
- Watch for This: The mixture should look fluffy and slightly pale—this means you’ve achieved the ideal texture!
Step 2: Flavor & Chill
- (Optional) Fold in any add-ins like mini chocolate chips, citrus zest, or a drizzle of caramel.
- Cover the bowl with plastic wrap and refrigerate for 1 hour (or up to overnight).
- Why This Matters: Chilling firms up the mixture, making it easier to shape.
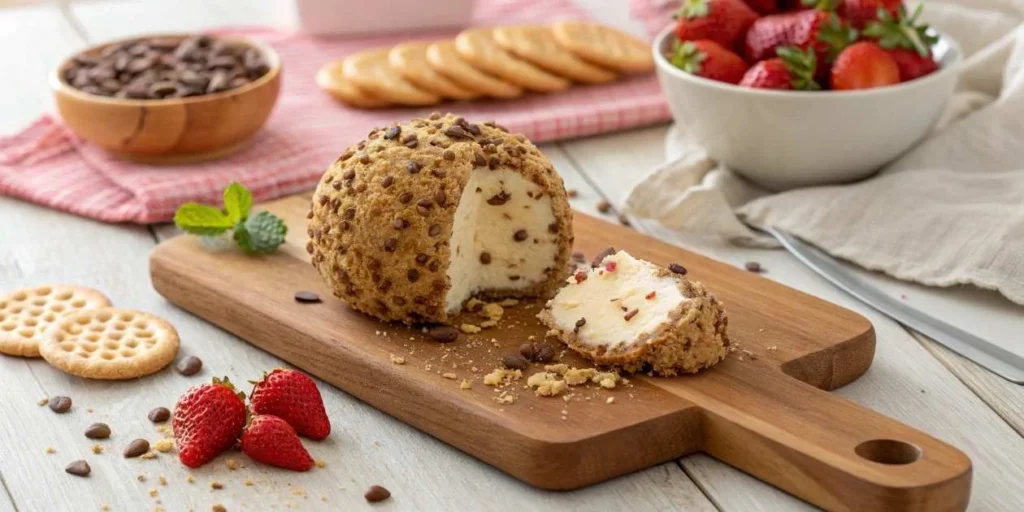
Step 3: Shape & Coat
- Scoop the chilled mixture onto a sheet of parchment paper and gently roll into a smooth ball (lightly damp hands prevent sticking!).
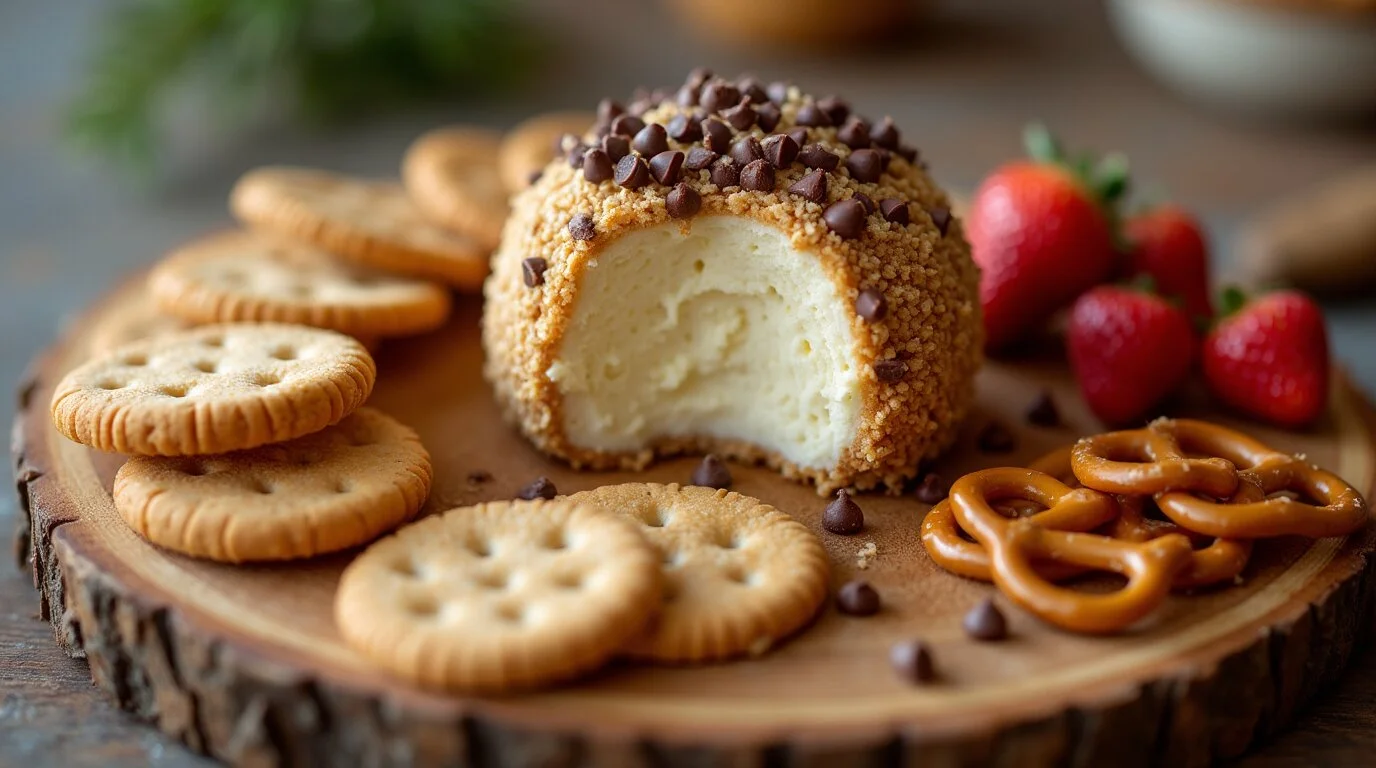
- Spread graham cracker crumbs on a plate and roll the ball until fully coated.
- Chef’s Secret: For extra crunch, press additional crumbs onto the surface with your hands.
Step 4: Serve & Shine!
- Transfer to a serving plate and pair with dipper favorites:
- Fresh strawberries, pretzel rods, or vanilla wafers
- A drizzle of melted chocolate for bonus decadence
Troubleshooting Tips:
- Too soft? Chill another 30 minutes before shaping.
- Cracks while rolling? Smooth with a butter knife—it’ll taste just as amazing!
Pro Tips & Variations Elevate Your Cheesecake Ball Game
Take your cheesecake ball recipe from great to extraordinary with these chef-approved secrets and creative twists:
Next-Level Techniques
• Flavor Infusion: Warm your vanilla extract with a split vanilla bean for 10 minutes to create a homemade vanilla boost
• Texture Play: Mix 1/4 cup of the graham crumbs right into the batter for delightful crunch pockets
• Professional Finish: Use a bench scraper to create perfectly smooth sides before coating
Holiday Magic:
- Roll in crushed candy canes + white chocolate drizzle
- Shape into a pumpkin for Halloween (use orange food coloring + pretzel stem)
Seasonal Twists:
- Summer: Mix in 2 tbsp lemon curd + coat with blueberry powder
- Fall: Add pumpkin spice to the batter + pecan crust
Storage Secrets
• Make-Ahead Mastery: Shape and coat balls, then freeze individually on parchment-lined trays before transferring to airtight containers (lasts 3 months!)
• Revival Trick: If refrigerated more than 2 days, refresh texture by kneading in 1 tbsp softened cream cheese
Common Pitfalls (Solved!)
→ Too sticky? Dust hands with powdered sugar when shaping
→ Crumb coating won’t stick? Lightly mist ball with water using a spray bottle
→ Serving stress? Present on a chilled marble slab to maintain perfect temperature
Serving Suggestions: How to Make Your Cheesecake Ball recipe the Star of Any Occasion
Your cheesecake ball isn’t just a dessert—it’s a versatile centerpiece waiting to shine!
Presentation Magic
- The Showstopper Board: Create a dessert charcuterie spread with:
Fresh fruit skewers (strawberries, grapes, pineapple)
Crisp biscotti and buttery shortbread cookies
Dark chocolate shards for elegant contrast
- Individual Bites: Use a melon baller to make mini cheesecake truffles—perfect for cocktail parties!
Timing is Everything
For best texture: Remove from fridge 15 minutes before serving (lets flavors bloom but keeps shape)
Outdoor events? Nestle your serving dish in a bowl of ice to maintain perfect consistency
Next-Level Pairings
- Beverage Partners:
Espresso martinis (adults only!) or cold milk for nostalgia
Sparkling rosé to cut through the richness
- Sauce Drizzles:
Salted caramel for sweet-salty balance
Tart raspberry coulis (bonus: swirl it into the cheesecake mix!)
Pro Tricks They Won’t Guess
Shape Surprise: Mold into a heart for Valentine’s Day or a pumpkin for Halloween
Crumb Upgrade: Toast your graham crackers with a pinch of cinnamon first
Leftover Hack: Crumble over pancakes next morning (trust me!)
Cheesecake Ball Recipe
Ingredients
The Dream Team
- 16 oz full-fat cream cheese softened (the star that creates that lush, creamy base)
- 1/2 cup unsalted butter softened (adds luxurious silkiness)
- 1 1/4 cups powdered sugar dissolves perfectly for a smooth texture
- 2 tsp pure vanilla extract for that warm, bakery-style flavor
- 1 1/2 cups graham cracker crumbs for the iconic sweet-crisp coating
Easy Swaps for Dietary Needs
- Gluten-free? Use gluten-free graham crackers or almond flour.
- Lower sugar? Reduce powdered sugar to 3/4 cup—it’ll still hold shape!
- Dairy-free? Substitute with vegan cream cheese and plant-based butter
Instructions
Step 1: The Creamy Base
- In a large mixing bowl, beat the softened cream cheese and butter together with an electric mixer on medium speed until perfectly smooth (about 2 minutes).
- Pro Tip: Scrape down the sides of the bowl halfway through to ensure no lumps remain.
- Gradually add the powdered sugar and vanilla extract, mixing on low speed until fully incorporated.
- Watch for This: The mixture should look fluffy and slightly pale—this means you’ve achieved the ideal texture!
Step 2: Flavor & Chill
- (Optional) Fold in any add-ins like mini chocolate chips, citrus zest, or a drizzle of caramel.
- Cover the bowl with plastic wrap
- Why This Matters: Chilling firms up the mixture, making it easier to shape.
Step 3: Shape & Coat
- Scoop the chilled mixture onto a sheet of parchment paper and gently roll into a smooth ball (lightly damp hands prevent sticking!).
- Spread graha
- Chef’s Secret: For extra crunch, press additional crumbs onto the surface with your hands.
Step 4: Serve & Shine!
- Transfer to a serving plate and pair with dipper favorites:
- Fresh strawberries, pretzel rods, or vanilla wafers
- A drizzle of melted chocolate for bonus decadence
Troubleshooting Tips
- Too soft? Chill another 30 minutes before shaping.
- Cracks while rolling? Smooth with a butter knife—it’ll taste just as amazing!
Notes
- Calories: 220
- Total Fat: 14g
- Saturated Fat: 8g
- Cholesterol: 35mg
- Sodium: 120mg
- Carbohydrates: 20g
- Sugar: 16g
- Protein: 3g
- Fiber: 0g
Conclusion
You’re now armed with everything needed to create the most talked-about dessert at every gathering. This cheesecake ball isn’t just a recipe—it’s your new secret entertaining weapon that:
✓ Comes together with minimal effort but delivers maximum wow factor
✓ Adapts to any season or occasion with endless variations
✓ Always leaves guests begging for the recipe
Remember what makes it special:
• That velvety texture from properly softened ingredients
• The satisfying contrast of creamy interior and crunchy coating
• The joy of customization that makes it uniquely yours
I’d love to know how you put your own spin on it! Tag me when you share your creations—I live for those “recipe success” stories. Now go forth and impress! (And don’t be surprised when this becomes your most-requested dessert.)
FAQs
Let’s clear up some of the most common questions so you can feel totally confident making this sweet showstopper:
Can I make the cheesecake ball ahead of time?
Absolutely! This recipe is perfect for prepping ahead. In fact, chilling it for a few hours—or even overnight—helps it firm up and makes it easier to shape and serve. Just wrap it tightly in plastic wrap and store it in the fridge until you’re ready to roll it in your toppings.
How long does a cheesecake ball last in the fridge?
Stored in an airtight container, it will stay fresh for up to 5 days in the refrigerator. Just be sure to keep it chilled when not serving, especially if you’re using dairy-based coatings or fresh fruit.
Can I freeze it?
Yes, you can! Wrap the uncoated cheesecake ball tightly in plastic wrap and place it in a freezer-safe bag. Freeze for up to 1 month. When ready to serve, thaw it overnight in the fridge, then roll it in your desired coating just before serving for best texture.
Is this cheesecake ball gluten-free?
It can be! Just swap the graham crackers or cookie coating for a gluten-free alternative, and double-check that all your mix-ins (like chocolate chips or sprinkles) are certified gluten-free.
What do I serve with it?
This dessert dip pairs perfectly with:
Graham crackers
Vanilla wafers
Pretzels (for that sweet-and-salty magic)
Apple slices or strawberries
Gluten-free cookies or rice crackers for dietary needs
Can I make it without a stand mixer?
Definitely. A handheld mixer or even a sturdy spoon and a little elbow grease will do the trick. Just make sure your cream cheese is fully softened—that’s the key to a smooth, creamy texture.