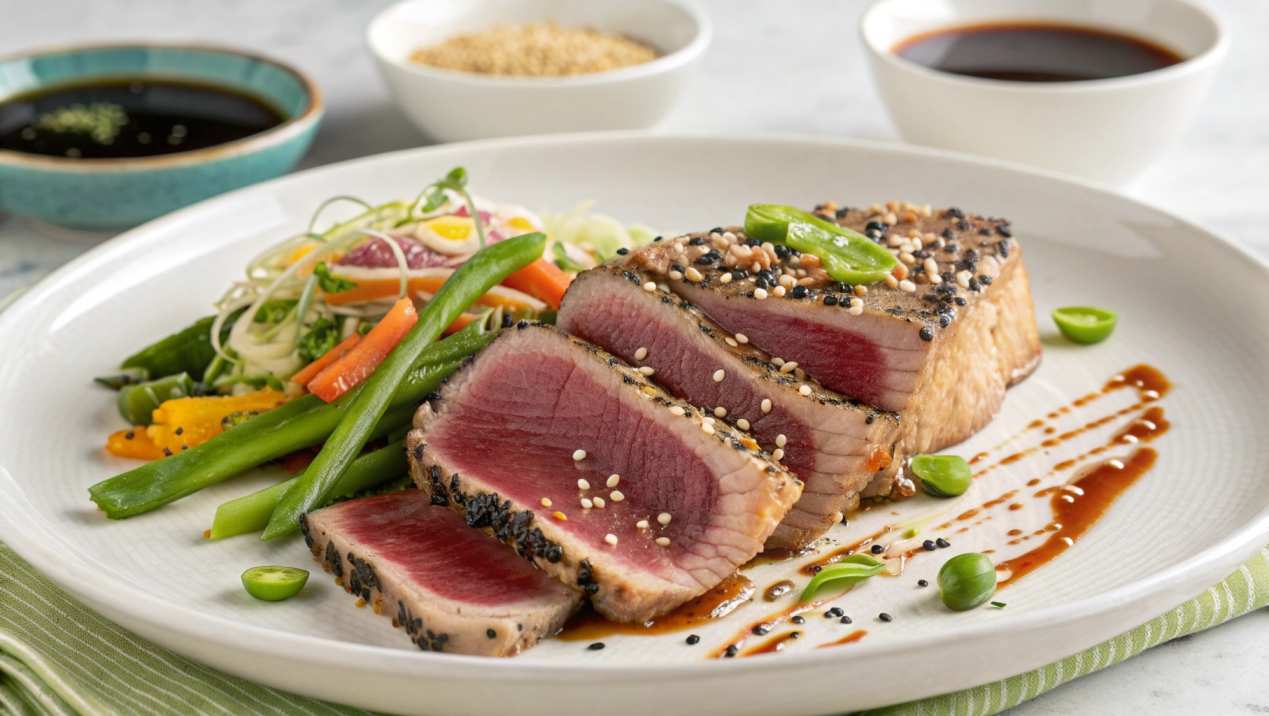
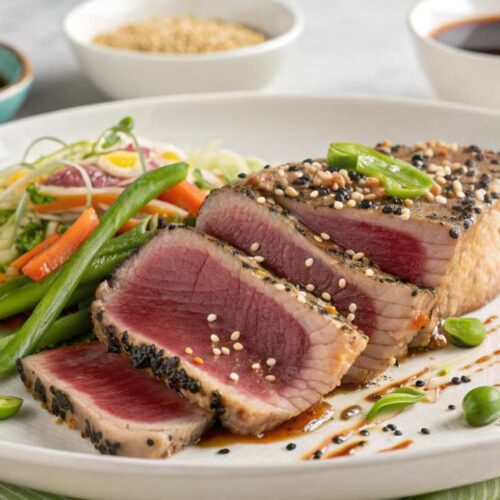
If you’re a fan of fresh, flavorful meals that come together in no time, this Ahi Tuna Recipe – Seared and Deliciously Simple to Make – is perfect for you. Picture this: a beautiful, tender ahi tuna steak with a perfectly seared crust that locks in all the juicy, omega-3 goodness. Not only is it a quick and easy dish, but it’s also packed with protein and low in calories, making it an ideal option for anyone looking to enjoy a healthy, satisfying meal. Whether you’re a seasoned cook or new to the kitchen, this recipe brings restaurant-quality flavor right to your home. Ready to make an impression with your next meal? Let’s dive in!
Table of Contents
Table of Contents
Key Benefits of This Ahi Tuna Recipe – Seared and Deliciously Simple
If you’re looking for a meal that’s not only quick and easy but also incredibly flavorful, this seared ahi tuna recipe is a game-changer. Whether you’re a busy professional or just craving a healthy meal, this recipe offers a range of benefits that will keep you coming back for more. Here’s why:
- Packed with Protein and Omega-3s: Ahi tuna is loaded with high-quality protein and healthy omega-3 fatty acids, making it an excellent choice for anyone looking to fuel their body with nutritious, lean protein. It’s a heart-healthy, low-calorie option that’s perfect for maintaining energy levels throughout the day.
- Quick and Easy: This recipe takes just minutes to prepare and cook—ideal for a fast weeknight dinner or a last-minute addition to your meal prep routine. With minimal ingredients and steps, it’s a no-fuss recipe that guarantees big flavor with little effort.
- Versatile and Flavorful: Ahi tuna is incredibly versatile, and this simple sear method lets the natural flavors shine. Whether you like it slightly rare or fully cooked through, you can customize the doneness to your preference. Plus, you can experiment with different seasonings or toppings to keep the recipe fresh each time.
- Simple, Fresh Ingredients: The best part? You only need a handful of ingredients: ahi tuna steaks, a bit of olive oil, and your seasoning of choice. It’s an ideal recipe for when you want something quick, but still want to eat something fresh and full of flavor. Plus, it’s a great option if you’re looking to eat clean, without sacrificing taste.
- Perfect for Any Occasion: Whether you’re cooking for yourself, entertaining guests, or looking to impress someone special, this recipe fits every occasion. It’s an elegant yet simple dish that works equally well as a quick dinner or as a stylish appetizer for a party.
By combining healthy ingredients with a straightforward cooking technique, this recipe doesn’t just taste amazing—it also provides all the nutritional benefits you need. Ready to get cooking? Let’s move on to the next step!
Ingredients for Your Seared Ahi Tuna
To make this easy and delicious ahi tuna recipe, you’ll need just a few key ingredients. Don’t worry—nothing fancy here, just simple, fresh items that will bring out the natural flavors of the tuna. Here’s everything you’ll need:

- Ahi Tuna Steaks (2, about 6 oz each): Choose fresh, high-quality ahi tuna steaks for the best flavor. Look for tuna with a rich, red color, which indicates freshness. If you’re unsure, ask your fishmonger for recommendations.
- Olive Oil (2 tbsp): This will help achieve a perfect sear while adding a light, fruity note to the tuna. Avocado oil is also a great option if you prefer something with a higher smoke point.
- Salt and Freshly Ground Black Pepper (to taste): A simple seasoning, but it’s essential to enhance the natural flavors of the tuna. Don’t be afraid to season generously!
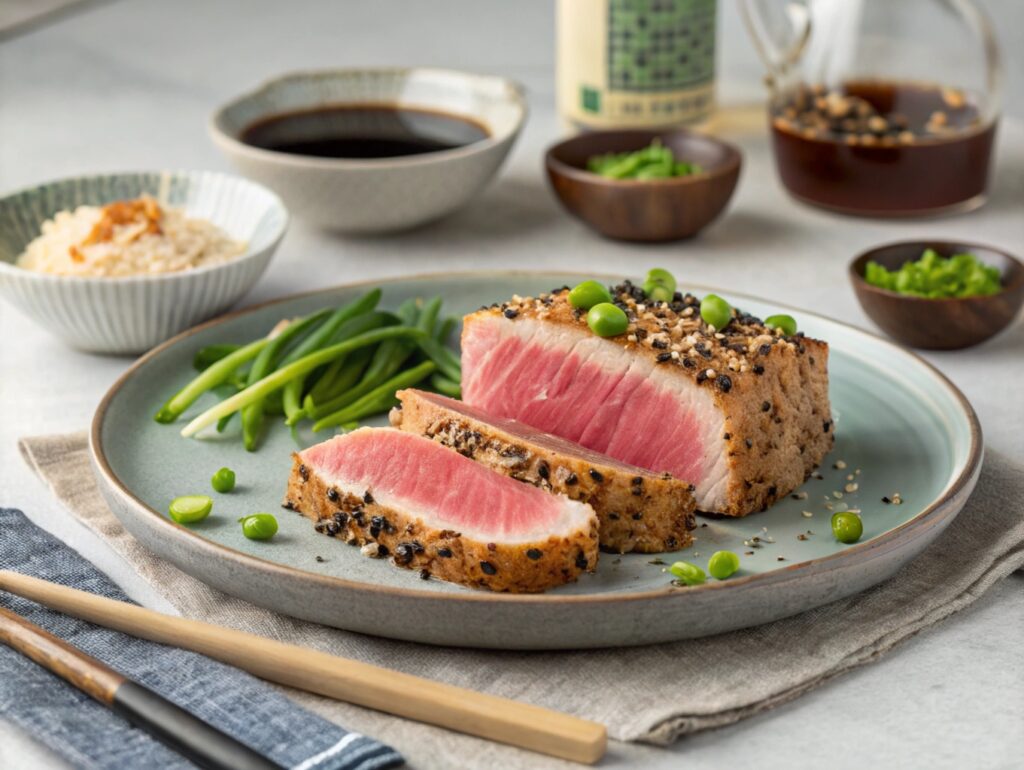
- Sesame Seeds (2 tbsp): Optional, but they’re a great addition for some crunch and nutty flavor. Toasting them lightly before adding them to the tuna gives an extra depth of flavor.
- Soy Sauce (1 tbsp): Adds a savory, umami boost to the dish. You can swap this for tamari if you’re avoiding gluten.
- Garlic (1 clove, minced): A little garlic goes a long way in adding depth to the flavor.Fresh garlic is ideal, though garlic powder can be substituted if fresh isn’t available
- Lemon (1, cut into wedges): Fresh lemon juice brightens up the dish and balances the richness of the tuna. It’s perfect for drizzling over the finished tuna or for a quick squeeze during cooking.
- Chili Flakes (optional): For those who like a little heat, a pinch of chili flakes can add a spicy kick to the dish. You can adjust the amount to suit your desired level of spice!
These ingredients come together in a perfect balance of flavors, enhancing the freshness of the ahi tuna while keeping things simple. Now, with everything prepped and ready, you’re just one step away from enjoying this flavorful, restaurant-quality dish at home. Let’s move on to the next part!
How to Sear Ahi Tuna Perfectly – Step-by-Step Instructions
Searing ahi tuna recipe might sound like something you’d only order at a restaurant, but it’s surprisingly easy to do at home. With just a few simple steps, you’ll have a golden-crusted, tender-centered tuna steak ready in minutes. Let’s walk through it together—step by step!
1. Pat the Tuna Dry
Before anything else, use paper towels to pat your tuna steaks dry. Removing moisture helps you get that ideal sear—it’s the secret to a crisp, golden crust instead of a soggy surface.
2. Season Generously
Sprinkle both sides of each steak with salt and freshly cracked black pepper. Don’t be shy here! This basic seasoning enhances the natural flavor of the tuna without overpowering it.
3. Heat the Skillet
Place a heavy-bottomed pan (like cast iron or stainless steel) over medium-high heat. Add about 2 tablespoons of olive oil. Wait until the oil shimmers—this means it’s hot enough for searing.
Pro Tip: If the oil starts to smoke, lower the heat slightly—too hot and you’ll burn the crust before the inside cooks.
4. Sear the Tuna – First Side
Gently lay the tuna steak in the hot pan. Let it cook without moving it for 1½ to 2 minutes. You’ll see the bottom edges start to turn opaque—this is your cue that the crust is forming.
5. Flip and Finish
Carefully flip the steak with tongs. Sear the other side for another 1½ to 2 minutes, depending on your desired doneness.
- For rare, stick to 1½ minutes per side.
- For medium, go closer to 3 minutes per side.
- Avoid overcooking—it dries out quickly and loses that buttery texture.
6. Let It Rest
Remove the tuna from the heat and let it rest for a minute or two. This helps the juices redistribute and gives you a tender, melt-in-your-mouth finish.
7. Slice and Serve
Use a sharp knife to cut the tuna across the grain into thin slices. Serve immediately with your favorite sauce or a squeeze of fresh lemon for a zesty touch.
That’s it! With minimal ingredients and just a few minutes on the stove, you’ve created a beautifully seared ahi tuna steak that’s restaurant-worthy. Whether you’re cooking for yourself or impressing a guest, this technique never fails to deliver big flavor with minimal effort.
Ready to elevate it even further? Let’s jump into some pro tips and creative variations next!
Pro Tips and Flavorful Variations for Seared Ahi Tuna
Searing ahi tuna is simple, but a few insider tips can take it from good to unforgettable. Whether you’re making it for a casual weeknight dinner or a special occasion, these tips and creative twists will help you perfect your seared ahi tuna every time.
Expert Tips for Searing Ahi Tuna to Perfection:
- Start with Sushi-Grade Tuna
For the best texture and flavor, always choose sushi-grade ahi tuna—especially if you’re serving it rare in the center. Ask your fishmonger if the tuna is safe to eat raw or lightly seared. - Room Temperature is Key
Let your tuna steaks sit at room temperature for about 15–20 minutes before cooking. This ensures even searing and prevents the outer edges from overcooking while the center stays ice cold. - Don’t Overcrowd the Pan
If you’re searing more than one steak, give them space. Crowding the pan lowers the temperature and leads to steaming instead of searing. - Use a High-Smoke Point Oil
Olive oil works great, but you can also use avocado oil or grapeseed oil for higher heat cooking. This gives you a more even sear and reduces the chance of burning. - Cut Against the Grain
When slicing the tuna after searing, always cut against the grain. This results in tender, easy-to-chew pieces that showcase the tuna’s buttery texture.
Tasty Variations to Try
- Sesame-Crusted Ahi Tuna
Press your tuna steaks into a mix of white and black sesame seeds before searing. It adds a beautiful crunch and a nutty, toasty flavor that pairs perfectly with the tender tuna. - Spicy Tuna Rub
Mix chili powder, garlic powder, and smoked paprika for a spicy dry rub. Apply before searing for a bold, smoky kick. You can also drizzle with sriracha mayo after slicing for extra heat. - Citrus-Soy Glaze
Combine low-sodium soy sauce, fresh lime or orange juice, and a touch of honey. Brush it over the tuna during the last 30 seconds of searing for a sweet-savory glaze that caramelizes beautifully. - Wasabi Ginger Crust
Mix wasabi paste with finely minced ginger and coat the tuna lightly before searing. It gives the dish a punch of heat and zesty brightness. - Asian-Inspired Marinade
Marinate the tuna briefly (10–15 minutes max) in a blend of soy sauce, sesame oil, garlic, and rice vinegar. This adds extra umami and depth of flavor without overpowering the fish.
With just a few tweaks or add-ins, you can keep this seared ahi tuna recipe feeling new and exciting every time. Whether you love bold spice or prefer delicate, citrusy notes, there’s a variation here to match your mood—or impress your guests! Up next, let’s explore how to serve it beautifully.
Serving Suggestions for Seared Ahi Tuna
Now that your seared ahi tuna is perfectly golden on the outside and tender in the center, it’s time to plate it like a pro. This dish is wonderfully versatile—whether you’re aiming for something light and fresh or bold and satisfying, there’s a perfect way to serve it.
Light and Refreshing Pairings
- Over a Fresh Salad
Thinly sliced ahi tuna is a stunning topper for a crisp salad. Try it with mixed greens, cucumber ribbons, shredded carrots, and avocado. Drizzle with a sesame-ginger dressing or a light citrus vinaigrette. - Poke Bowl Style
Transform your seared tuna into a vibrant bowl with warm jasmine rice, edamame, pickled ginger, shredded nori, and a soy-sesame drizzle. Add some sliced radish or mango for a pop of color and sweetness. - Tuna Lettuce Wraps
Use butter lettuce leaves as a low-carb wrap. Add slices of tuna, a few slivers of red bell pepper, and a spoonful of spicy mayo for a light yet flavorful bite.
Hearty and Satisfying Options
- With Garlic Butter Rice
Serve tuna steaks whole over a bed of garlicky jasmine or basmati rice. Add a side of steamed green beans or asparagus for a well-rounded, protein-rich plate. - Alongside Roasted Veggies
Pair your tuna with a medley of oven-roasted vegetables like zucchini, sweet potatoes, and bell peppers. A drizzle of soy-lime reduction over everything ties the dish together beautifully. - Ahi Tuna Tacos
Slice the seared tuna and layer it into warm corn tortillas. Top with slaw, avocado crema, and a squeeze of lime. It’s a fun, casual twist that’s always a hit!
Perfect Drink Pairings
- White Wine: Try a crisp Sauvignon Blanc or a dry Riesling to complement the tuna’s richness without overpowering it.
- Beer: A cold pilsner or light IPA pairs well with the dish’s savory, umami flavors.
- Mocktail or Iced Green Tea: For a non-alcoholic option, a citrusy mocktail or unsweetened green tea adds refreshing balance.
No matter how you plate it, seared ahi tuna brings elegance and flavor to the table. The beauty of this dish is how effortlessly it fits into everything—from a quick lunch to an impressive dinner spread. Coming up next: a quick recap and helpful FAQ to wrap things up!
________________________________________________________________________________
_____________________________________________________________________
ahi tuna recipe -seared
Ingredients
- Ahi Tuna Steaks 2, about 6 oz each: Choose fresh, high-quality ahi tuna steaks for the best flavor. Look for tuna with a rich, red color, which indicates freshness. If you’re unsure, ask your fishmonger for recommendations.
- Olive Oil 2 tbsp: This will help achieve a perfect sear while adding a light, fruity note to the tuna. You can also use avocado oil if you prefer a higher smoke point.
- Salt and Freshly Ground Black Pepper to taste: A simple seasoning, but it’s essential to enhance the natural flavors of the tuna. Don’t be afraid to season generously!
- Sesame Seeds 2 tbsp: Optional, but they’re a great addition for some crunch and nutty flavor. Toasting them lightly before adding them to the tuna gives an extra depth of flavor.
- Soy Sauce 1 tbsp: Adds a savory, umami boost to the dish. You can swap this for tamari if you’re avoiding gluten.
- Garlic 1 clove, minced: A little garlic goes a long way in adding depth to the flavor.Fresh garlic is ideal, though garlic powder can be substituted if fresh isn’t available
- Lemon 1, cut into wedges: Fresh lemon juice brightens up the dish and balances the richness of the tuna. It’s perfect for drizzling over the finished tuna or for a quick squeeze during cooking.
- Chili Flakes optional: For those who like a little heat, a pinch of chili flakes can add a spicy kick to the dish. You can adjust the amount to suit your desired level of spice!
Instructions
- Pat the Tuna Dry
- Before anything else, use paper towels to pat your tuna steaks dry. Removing moisture helps you get that ideal sear—it’s the secret to a crisp, golden crust instead of a soggy surface.
- Season Generously
- Sprinkle both sides of each steak with salt and freshly cracked black pepper. Don’t be shy here! This basic seasoning enhances the natural flavor of the tuna without overpowering it.
- Heat the Skillet
- Place a heavy-bottomed pan (like cast iron or stainless steel) over medium-high heat. Add about 2 tablespoons of olive oil. Wait until the oil shimmers—this means it’s hot enough for searing.
- Sear the Tuna – First Side
- Gently lay the tuna steak in the hot pan. Let it cook without moving it for 1½ to 2 minutes. You’ll see the bottom edges start to turn opaque—this is your cue that the crust is forming.
- Flip and Finish
- Carefully flip the steak with tongs. Sear the other side for another 1½ to 2 minutes, depending on your desired doneness.
- Let It Rest
- Remove the tuna from the heat and let it rest for a minute or two. This helps the juices redistribute and gives you a tender, melt-in-your-mouth finish.
- Slice and Serve
- Use a sharp knife to cut the tuna across the grain into thin slices. Serve immediately with your favorite sauce or a squeeze of fresh lemon for a zesty touch.
Notes
Conclusion: Seared Ahi Tuna Made Simple and Spectacular
And there you have it—ahi tuna seared to perfection, bursting with flavor, texture, and versatility. Whether you’re preparing a quick weeknight dinner or hosting a special gathering, this recipe delivers a restaurant-quality dish with surprisingly little effort.
This dish is characterized by its simplicity. With just a few pantry staples and a quality cut of tuna, you can create something that looks elegant, tastes amazing, and feels incredibly rewarding to serve. It’s the kind of recipe that becomes a go-to in your rotation—easy enough for beginners, impressive enough for seasoned cooks.
Plus, with the endless serving options—from rice bowls and salads to tacos and wraps—you can switch it up depending on your mood or the occasion. It’s lean, protein-rich, and packed with omega-3s, making it a smart and satisfying choice all around.
So next time you’re craving something fresh, flavorful, and fast, this seared ahi tuna recipe will have your back. Experiment with it, add your personal touch, and above all—savor every bite!
FAQs About Seared Ahi Tuna
Whether you’re trying seared ahi tuna for the first time or looking to refine your technique, these frequently asked questions will help guide you toward perfect results every time. Let’s clear up a few common concerns and curiosities!
Can I eat ahi tuna rare?
Absolutely—sushi-grade ahi tuna is meant to be enjoyed rare or medium-rare in the center. Just be sure to purchase it from a trusted fishmonger or market that labels it safe for raw consumption.
How do I know when ahi tuna is done searing?
The edges will turn opaque after 1–2 minutes.
The center should still feel soft when pressed, especially if you want it rare.
If you’re going for medium, cook each side a bit longer—but be careful not to overdo it, as tuna can dry out quickly.
What if I don’t have sushi-grade tuna?
If you can’t find sushi-grade tuna, you can still cook it—but it’s best to cook it through rather than serve it rare. Keep the heat medium and cook each side for about 3–4 minutes until fully opaque.
Can I marinate the tuna ahead of time?
Yes—but keep it short. Ahi tuna is delicate, so marinate for no more than 15–20 minutes to avoid changing the texture. Acidic ingredients (like citrus juice or vinegar) can begin “cooking” the fish if left too long.
What are the best seasonings for seared ahi tuna?
Simple is best. Sea salt, cracked black pepper, and a light coating of sesame seeds create a flavorful crust. You can also experiment with spice rubs, citrus zest, or Asian-inspired blends for more depth.
Can I freeze leftover seared tuna?
It’s not ideal. Seared tuna is best enjoyed fresh, but if you have leftovers, store them in an airtight container in the fridge for up to 2 days. Slice and serve cold over salads or rice bowls for a delicious next-day meal.